Pear and Ginger Paste

pear and ginger paste

I love those small pots of fruit paste you buy in the supermarkets to add to a cheese platter. They are usually around the $6.00 mark so fall into the category of a treat not an everyday purchase. Today I made nine pots of pear and ginger paste for $5.00. It takes a few hours, even using the Thermomix but the results are amazing.  They make a nice gift and it’s a lovely addition to your cheese platter. I use Jamsetta, a pectin product available in the supermarket baking aisle to ensure my paste sets firmly.

Pear and Ginger Paste

Ingredients

  • 10 cm fresh ginger/peeled/zested
  • 5 pears/quartered /cored
  • 2 apple/ quartered /cored
  • 1 lemon/ zest only/grated
  • 40 gms of freshly squeezed lemon juice
  • 500 gms sugar
  • 15 gms Jamsetta

Method

  • Line a shallow 20 x 30 cm baking tray with baking paper and set aside or use small plastic containers with lids.
  • Add pears, ginger, apple, lemon juice, lemon zest, Jamsetta and sugar and blitz for 10 sec/speed 8.
  • Cook for 30 min/100/speed 1/MC* on and then scrape down sides of bowl.
  • Cook 60 min/100°C/speed 3/MC off and basket on top of lid. Scrape down sides and cook a further 60 min/100°C/speed 3.
  • Pour into the prepared baking tray or plastic containers and place in the fridge to set (at least 2 hours).
  • Once set, slice and serve immediately or place lids on containers and store in the fridge until ready to serve.  Will keep for at least 3 months.

*MC = Measuring cup

Thai Chicken Salad

thai chicken saladThis is a great recipe for those warm days when you are craving a salad. It’s a really forgiving recipe, you can add more chicken or use beef, increase the amount of salad, add cold vermicelli noodles etc etc. Even if you are not a fan of coriander please add the roots to the sauce. It really adds to and balances the flavour. Experiment with the sauce and  tweak the flavour combos until it best suits your palate.

Serves 4

INGREDIENTS

Nam Jim Sauce

  • Roots from 1 bunch of coriander
  • 2 cm piece ginger, finely grated
  • 2 cloves garlic, thinly sliced
  • 4 long red chillies, seeded, thinly sliced on the diagonal
  • 2 lemons or limes, zested, juiced
  • 2 tablespoons fish sauce
  • 55g (1/4 cup firmly packed) brown sugar
  • 1 teaspoon sesame oil

Marinated Chicken

  • 700 grams chicken, sliced thinly
  • 1 teaspoon garlic powder
  • 1 tablespoon soy sauce
  • 4 tablespoons chilli jam or sweet chilli sauce
  • 2 tablespoons oil (for frying)

Salad

  • 1 red onion, thinly sliced
  • 1 punnet of cherry tomatoes, halved
  • 1 Lebanese cucumber, halved, seeded, thinly sliced
  • 1 red capsicum, seeded and sliced
  • 3 spring onions, sliced finely (white and green parts)
  • 1 bag of mixed lettuce leaves
  • 1 carrot, sliced finely into matchsticks
  • 1 cup mint leaves

Garnish

  • Leaves from 1 bunch of coriander (optional)
  • ¼ cup crushed peanuts (optional)

PREPARATION

  • Place all sauce ingredients into a food processor/blender/Thermomix and blitz until well combined.
  • Add chicken, garlic powder, soy sauce and chilli jam/sweet chilli sauce to a bowl and mix till the chicken is coated. Cover the bowl with plastic wrap and keep in the fridge for at least 30 minutes.
  • Heat oil in a pan over medium-high heat. Cook chicken, reducing heat when necessary, until no longer pink in centre and juices run clear. Transfer to a plate and cover with foil to keep warm.
  • Place lettuce, cucumber, onions, tomato, capsicum, carrot and mint leaves in a large mixing or serving bowl. Toss to combine.
  • Place cooked chicken on top of the salad mix and add garnish.
  • Drizzle sauce over the top just before serving.

Low Fat Lemon Curd – 3 ways

lemon curdLow Fat Lemon Curd 

I have been making this for years. It is simple and contains no butter, making it a low fat alternative. It is beautiful in puddings, on toast or on top of greek yoghurt or straight out of the jar!  So easy to make on the stove top, microwave or the easiest of them all,  the Thermomix.

Ingredients

• Juice of 2 large lemons, strained
• 1/2 cup castor sugar (120 grams)
• 2 large eggs
• 4 tablespoons lemon zest (peel of 1 lemon for Thermomix version)

Preparation – Thermomix

  • Place lemon peel and sugar in bowl 30 seconds/ speed 9. Stop to scrape down the bowl a few times.
  • Add other ingredients into bowl.
  • Insert butterfly and cook  8 minutes/80º/speed 3.
  • Transfer to a container and cover (to prevent a skin from forming), then refrigerate.
  • Makes 1 cup of low fat lemon curd.

Preparation – stove top

  • Place strained lemon juice and sugar in a small saucepan. Heat on low and stir until sugar has dissolved.
  • Lightly beat egg in a medium bowl.
  • Remove lemon syrup from heat and pour slowly into beaten egg while stirring the mixture with a whisk. Continue to whisk by hand for one minute.
  • Return mixture to saucepan; add lemon zest, and heat on low until it thickens — about two minutes.
  • Remove from heat. Transfer to a container and cover (to prevent a skin from forming), then refrigerate.
  • Makes 1 cup of low fat lemon curd.

Preparation – microwave

  • Place strained lemon juice and sugar in a microwave proof jug. Heat on full power for 1 minute stirring to make sure the sugar is dissolved.
  • Lightly beat eggs in a medium bowl.
  • Remove lemon syrup from the microwave and pour slowly into beaten egg while stirring the mixture with a whisk. Continue to whisk by hand for one minute.
  • Return mixture to the jug; add lemon zest, and cook for 1 minute on full power, stir, cook for another minute and stir. The curd should have thickened slightly.
  • Remove from heat. Transfer to a container and cover (to prevent a skin from forming), then refrigerate.
  • Makes 1 cup of low fat lemon curd.

Mini Banana Cakes with Cream Cheese Frosting – Thermomix


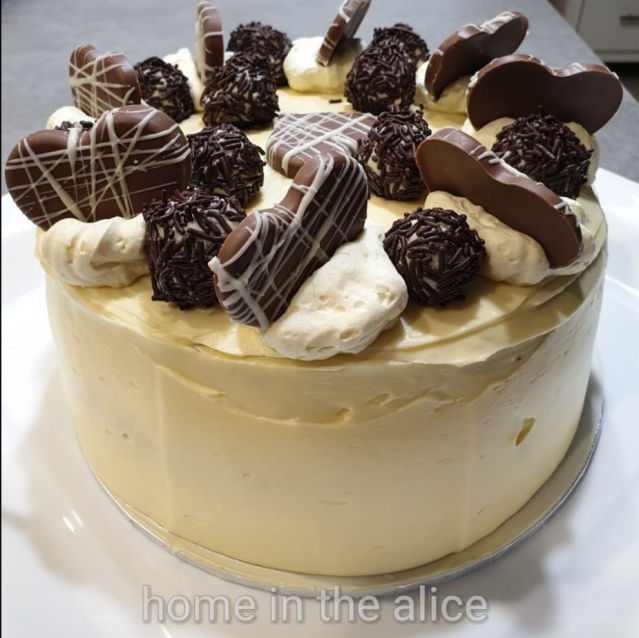
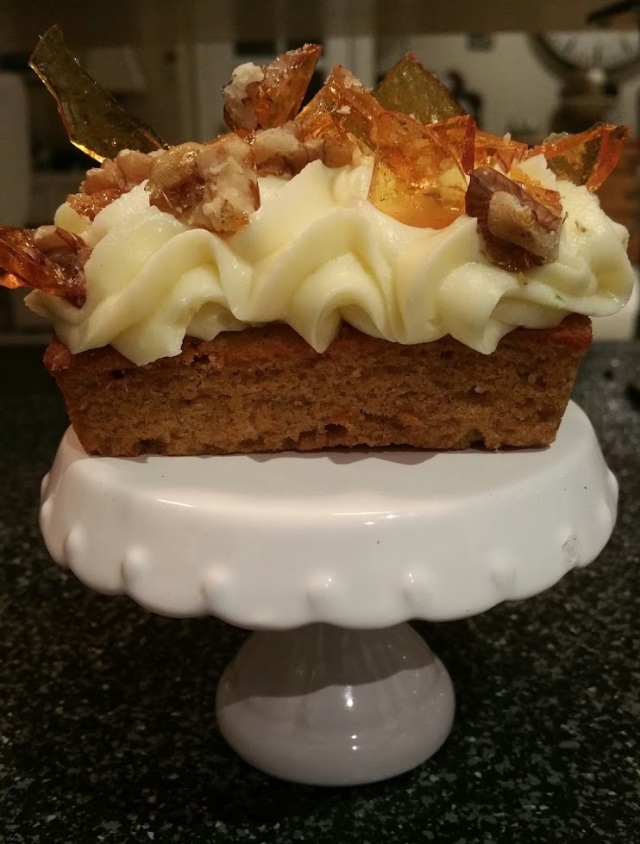
These lush little cakes are easy to make and so delicious. The cake and frosting can be prepared in a Thermomix. The toffee needs to be prepared on the stove top. One tip for making the toffee is to use a small non stick frypan, it cooks quickly and it’s easy to clean the pan afterwards. I used 6 Cup Silicone Mini Loaf Trays to make these cakes. The trays are available at KMart for $5.00 (see pic at the bottom of this post). This recipe will make 12 mini cakes. I have broken the recipe down to three sections; cake, frosting and toffee shards. Enjoy!

For more great recipes, cooking, gardening, decorating and crafting tips please visit and like my facebook page https://www.facebook.com/homeinthealice/

carrot cake


Banana Cake

Ingredients

  • 3 ripe peeled bananas
  • 150 grams caster sugar
  • 150 grams softened butter
  • 2 eggs
  • 240 grams self-raising flour
  • 2 teaspoons cinnamon
  • 1/2 teaspoon bicarb soda
  • 30 grams milk
  • 1 tsp vanilla essence

Preparation

  • Preheat oven to 160ºC.
  • Place bananas and vanilla extract into mixing bowl: 5 seconds/ Speed 4. Set aside.
  • Without cleaning the bowl, add butter and sugar: 10 seconds /Speed 5.
  • Add the eggs:  10 seconds/ Speed 5.
  • Add the banana mixture: 5 Seconds/ Speed 5.
  • Add flour, cinnamon/bicarb soda and milk: 15 seconds/ Speed 4.
  • Pour the mixture into patty pans or greased silicone pans.
  • Cook for 20 minutes. Check with a skewer, if it comes out clean, cakes are cooked.
  • Cook for an additional 5 minutes if required.

Cream Cheese Frosting

Ingredients

  • 250g cream cheese, softened
  • 150g butter, softened
  • 350g icing sugar
  • Zest of 1 lime
  • I tablespoon lime juice

Preparation

  • Place all ingredients in mixing bowl: 10 seconds/speed 5.
  • Scrape down sides of bowl mix: 10 seconds/speed 5.

Walnut shards

Ingredients

  • 215g (1 cup) caster sugar
  • 60ml (1/4 cup) water
  • ¼ cup walnuts

Preparation

  • Prepare a small baking tray/pizza tray by covering it with baking paper and sprinkle nuts over it.
  • Stir water and sugar in a saucepan over low heat until the sugar dissolves. Don’t bring it to the boil until all the sugar is dissolved.
  • Increase heat to high. To dissolve any sugar left on the side of the pan, brush down with a wet pastry brush if required. Bring to boil.
  • Cook until the mixture is a rich golden colour – be careful not to let it let it burn.
  • Pour the toffee over the nuts and make sure it’s spread thinly over the tray.
  • When the toffee hardens (you can put it in the fridge to speed up the process) break it up with a sharp knife.


Assembly

  • Once the cakes are cooled spread or pipe cream cheese frosting on the top and sprinkle toffee shards on top of the frosting.


Notes:

  • If you don’t have enough ripe bananas substitute a small carrot in place of one banana. You may have to mix for a further 5 seconds in the first step of the recipe to ensure the carrot is finely grated.
  • You can substitute another nut in place of walnuts e.g. pecans, pistachios or make it nut free.
  • You can omit the lime in the frosting and add 2 teaspoons of vanilla extract or replace the lime with lemon. Making the frosting in advance and placing it in the fridge assists with piping.
  • Instead of making mini cakes, this mixture can be baked in a 20cm cake tin greased and lined on the bottom with baking paper. Bake at the same temperature for an hour and then check, cook for an additional 10 minutes if required.loaf pan

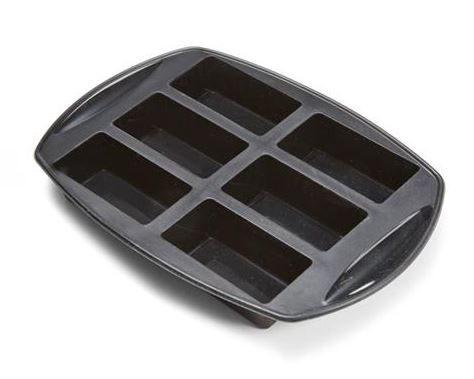
6 Cup Silicone Mini Loaf Trays available at KMart for $5.00. So handy for baking finger buns, bread rolls etc.


Yellow Butter Cake – Thermomix

This is such an easy cake that slices well and keeps moist for ages. I used to love Duncan Hines or Betty Crocker yellow cake packet mixes. I haven’t seen them on the supermarket shelf for ages. This recipe is just as easy as preparing a packet mix and tastes so much better. The secret ingredient is custard powder. It gives the cake a lovely yellow colour. It only takes 30 seconds in your Thermomix and it’s ready for the oven! It is a great kids birthday party cake for decorating, as it can be shaped and will hold icing well. I like it with lemon icing for an afternoon tea treat.

butter cake

Yellow Butter Cake


Ingredients

  • 250 grams self-raising flour
  • 250 grams softened  butter
  • 2 teaspoons vanilla essence
  • 400 grams caster sugar
  • 4 eggs
  • 100 grams custard powder
  • 250 grams buttermilk*


Preparation

  • Preheat a fan forced oven to 160C.
  • Place all ingredients in mixing bowl: 15 seconds/speed 5/measuring cup on.**
  • Scrape batter down from the sides and mix: 15 seconds/speed 5/measuring cup on.
  • Pour into a greased and lined on the bottom of a 23 cm deep square tin. Cook 1 hour.
  • Check cake with a skewer (it should come out clean). Bake for a further 5 to 10 minutes if required.


Note: * to make buttermilk add a tablespoon of vinegar or lemon juice to a cup of milk and let it stand for a minute.

** If you don’t own a Thermomix add all ingredients to a mixing bowl and beat with an electric  hand beater/stand mixer  until mixture is smooth.


For great recipes, home and gardening tips please like my facebook pagehttps://www.facebook.com/homeinthealice/ 

Red Velvet Cake – Thermomix


red velvetcupcakes


Red Velvet cake is rich and moist and so yummy with cream cheese frosting. I have adapted a recipe that’s been around for years that makes it even quicker to prepare in the Thermomix. If you want to prepare it the traditional way check the link at the bottom of the recipe. I usually make this recipe into cupcakes for special occasions. Today I gave my new kitchen gadget – a batter dispenser a work out. It was great for cupcakes… no messy drips….


cup cake dispenser


Red Velvet Cake

Ingredients

  • 300 grams plain flour
  • 1 teaspoon baking powder
  • 1 teaspoon bicarbonate soda
  • 1 teaspoon salt
  • 2 tablespoons cocoa
  • 400 grams sugar
  • 250 grams vegetable/canola/bran rice oil
  • 2 eggs
  • 250 grams buttermilk *
  • 2 teaspoons vanilla extract
  • 60 mls red food colouring or 1 teaspoon gel paste red food color
  • 1 teaspoon white vinegar
  • 125 grams hot coffee


Preparation

  • Preheat oven to 160 degrees celsius.
  • Grease and flour two round 23 cm cake pans or grease and line the bake with baking paper.*
  • Add flour, baking powder, bicarbonate soda, salt, cocoa and sugar to the mixing bowl to blend : 10 seconds/speed 3.
  • Add the rest of the ingredients and mix:  10 seconds/speed 5.
  • Check if ingredients are mixed and if necessary mix again : 10 second/speed 5.
  • Pour the batter into the pans.
  • Bake on the middle rack of the oven for 30 to 40 minutes or until a toothpick inserted in the middle comes out clean. Don’t over cook.
  • Allow cakes to cool for 10 minutes before turning them out of the pans onto a rack to cool completely.
  • Ice with cream cheese frosting.

*Notes:

  • To make buttermilk add 1 tablespoon lemon juice or vinegar to a cup of milk)
  • Will make 24 cupcakes. Cook for 18-20 minutes.

Cream Cheese Frosting

Ingredients

  • 250 grams cream cheese (not  light)
  • 160 grams butter
  • 250 grams icing sugar
  • 2 teaspoons vanilla essence

Preparation

  • Add all ingredients to bowl and mix : 30 seconds/speed 5 or until smooth.
  • Refrigerate before  piping
  • Can be coloured.
  • Will ice a 30 cm cake or 24 cupcakes.

Adapted from http://divascancook.com/the-best-red-velvet-cake-recipe-easy-homemade-moist-with-southern-flair/

For great recipes, home and gardening tips please like my facebook page https://www.facebook.com/homeinthealice/ 


poached eggs with coriander -lime drizzle

This recipe is simple and very tasty. You can whip up this restaurant quality brekkie for a fraction of the cost of eating out and it’s ready in minutes. I garnished mine with Virtual Bacon Dust – a George Colombaris recipe. It has a beautiful umami flavour and definitely lifts any dish it’s sprinkled on.

poached egg


Please like my facebook page https://www.facebook.com/homeinthealice/  I post recipes, decorating and gardening tips daily.

Poached eggs with coriander -lime drizzle

Serves 2

Ingredients

  • 1 avocado (cut up into chunks)
  • 2 slices of toast
  • Coriander – lime drizzle (recipe below)
  • Coriander leaves (garnish)
  • 2 poached eggs (Thermomix method below)

Coriander-Lime Drizzle

Ingredients

  • 1/3 cup olive oil
  • Zest and juice of 1 lime
  • 1 1/2 tablespoons fresh coriander, chopped
  • 1 spring onion, finely chopped
  • 1 small long red chilli, finely chopped

Preparation

  • Pour oil into a microwave proof jug and heat for 15 seconds (oil should be just warm).
  • Add lime zest, lime juice, chopped coriander, spring onion, and chilli to the oil.
  • Place avocado chunks onto toast and make an indent in the middle for the egg.
  • Place egg on top of the avocado. Season with salt and pepper.
  • Garnish each with some of the sauce, making sure to distribute the herbs and chilli evenly.
  • Garnish with the coriander leaves and serve immediately.


Thermomix Poached Eggs –

Ingredients

  • 1800g of boiling water from the kettle (this is much quicker than boiling in TM)
  • 30 grams white vinegar
  • oil to spray the TM simmering basket
  • 2 eggs (straight from fridge)

Preparation

  • Pour boiling water and vinegar into bowl.
  • Spray basket with oil and then insert into bowl.
  • Bring the water back to boiling, approximately 2 mins / Varoma / speed 2.
  • Crack 2 eggs into separate containers.
  • Once the Varoma temperature light is on – set timer to cook 3 mins / Varoma / speed 2.
  • Pour eggs into the basket through the hole in the TM lid.
  • Meantime, make your toast and get your plate and slotted spoon ready to remove your eggs and serve over the avocado on toast.

Notes

  • If you don’t own a Thermomix make eggs using traditional methods
  • If you like eggs very soft and runny cook for 2 minutes.
  • Water MUST be at boiling temperature before putting the eggs in.
  •  You can poach 4 eggs at a time for the same amount of time. Just check if they are done to your liking. There is plenty of drizzle to make a double serving of this recipe.

Poached eggs recipe adapted from http://thermofun.com/thermofun-poached-eggs-recipe/

Coriander-Lime drizzle adapted from http://www.taste.com.au/recipes/35677/poached+eggs+with+coriander+lime+sauce+and+avocado

Virtual Bacon Dust http://catecancook.blogspot.com.au/2012_02_01_archive.html 

Light Mango Curd – Thermomix


It’s mango season and this is a delicious  way to enjoy that yummy mango flavour. This curd has no added fat and uses less eggs than traditional curd. It is so easy to make and is delicious on toast, as a filling in cakes or served with ice cream or Greek yoghurt. The easiest way to peel mangoes is to cut down each side and remove the cheeks. Slide the edge of the cheek down a wide glass. The flesh is saved in the glass and discard the skin.  I have included a link to show you how.  easiest hack for peeling mangoes

Please visit and like my Facebook page for more great recipes and tips

Home in the Alice


curd

Ingredients

• Juice of 2 large lemons, strained
• 2 tablespoons raw sugar
• 2 large eggs
• 2 mangoes (peel and use the cheeks)

Preparation

  • Place all ingredients into the thermomix (20 seconds/speed 6)
  • Scrape down the sides of the bowl with a spatula
  • Insert butterfly whisk, cook for 6 minutes/temp 80  C /speed 3
  • Pour into hot sterilised jars and seal with the lid.
  • Store curd in the fridge for up to 2 weeks.
  • Makes 2 small jars.


Pam’s Trifle

Trifle is a luscious British dessert that has stood the test of time. It usually consists of a cake layer, fruit, jelly, custard and cream. There are many variations of those key ingredients and a few methods of preparation. This is my mother’s recipe. She learned it from her mother and no doubt it has been passed down over many generations. Every Christmas and special occasion my mum would make a trifle and we would polish it off. It is an easy dessert to make but you do need to give yourself some time as the jelly needs to set and it definitely tastes better the next day. You can go the extra mile and make the sponge cake and custard from scratch, but it’s still delicious using store bought ingredients. My mum, my beautiful English rose passed away a few years ago. I am so grateful she taught me to cook and she lives on through her recipes.

Please like my Facebook page for great recipes, home and craft ideas     https://www.facebook.com/homeinthealice


trifle

Ingredients

  • 2 x 85 gram packets of jelly (Port Wine or Raspberry)
  • 500 grams of fruit (your choice i.e. tinned fruit salad – drained, tinned peaches- drained, strawberries, raspberries, bananas)
  • 500 mls thick vanilla custard (can be home made or shop bought)
  • 250 gram packet jam rollettes (or equivalent weight of madeira cake, swiss roll or sponge)
  • 1/3 cup Apera (sherry) – optional
  • 300 mls thickened cream
  • 2 teaspoons icing sugar mixture
  • 1 teaspoon vanilla essence
  • 1 Cadbury Flake bar

Preparation

  • Slice the cake and place it in the bottom and half way up the side of a large serving bowl until you have used all the cake up.
  • Layer the fruit over the cake. Sprinkle with Apera (sherry) if you are adding alcohol to the dish.
  • Place jelly crystals in a heatproof bowl. Add 500 mls of boiling water. Whisk until crystals have dissolved. Stir in 300ml cold water. Pour the jelly over the cake and fruit making sure the jelly coats the cake. Cover. Refrigerate for 4 hours or until firm.
  • Spoon custard over the jelly.
  • Using an electric mixer, beat cream, sugar and vanilla essence until soft peaks form. Top trifle with cream mixture. Cover. Refrigerate overnight.
  • Top with crushed Flake bar.


Tips…

  • If you are using tinned fruit in your trifle reserve the juice and replace it for the equivalent amount of cold water when making the jelly.
  • Do not use fresh pineapple, kiwi fruit or paw paw as the jelly will not set properly.
  • You can make trifle in individual glass bowls or glasses.
  • If you use store bought custard make sure it is a very thick one.


Baked Creamy Lemon Fish

This is such an easy recipe you can have dinner on the table in under half an hour. I first came across this recipe at a cooking demonstration in the 80’s when microwaves were all the rage and everyone wanted one (including me). I still use my microwave every day as an aid to cooking, I would hate to be without one.  I have tweaked and perfected this recipe over many years.  It is always delicious. You can also cook this dish in an oven if you prefer. Both methods are provided. I like to serve this dish with steamed rice to soak up that yummy sauce that almost magically makes itself as the fish is cooking, and a salad to cut through the richness. Cooking times given are an indication only as actual baking time will depend on the thickness and variety of fish. It should be opaque rather than transparent and flake easily with a fork when done.

For more great recipes and home tips like my facebook page…     https://www.facebook.com/homeinthealice/

fish 1

Serves 4

Ingredients

  • 4 fish fillets
  • 1/2 cup of cream
  • squeeze of lemon juice
  • 4 slices of lemon
  • 1 tablespoon dried parsley
  • 1 tablespoon dried chives
  • 1 teaspoon dried or powdered onions
  • 1/2 teaspoon salt
  • 1/2 teaspoon white pepper
  • 2 tablespoons butter

Preparation – microwave

  • Place fish fillets in an microwave proof dish.
  • In a jug mix the cream, lemon juice, parsley, onion, chives, salt and pepper.
  • Pour over the top of the fish fillets.
  • Place a slice of lemon on each fish fillet.
  • Dot the fish fillets with butter.
  • Cover the dish with plastic wrap and cook on high for 5 minutes.
  • Let the fish rest for 5 minutes and check fish is cooked.
  • Serve with steamed rice and a salad.

Preparation – oven

  • Preheat oven to 200 degrees Celsius
  • Place fish fillets in an oven proof dish.
  • In a jug mix the cream, lemon juice, parsley, onion, chives, salt and pepper.
  • Pour over the top of the fish fillets.
  • Place a slice of lemon on each fish fillet.
  • Dot the fish fillets with butter.
  • Cover the dish with foil and cook for 20 minutes.
  • Let the fish rest for 5 minutes and check fish is cooked.
  • Serve with steamed rice and a salad.

fish